
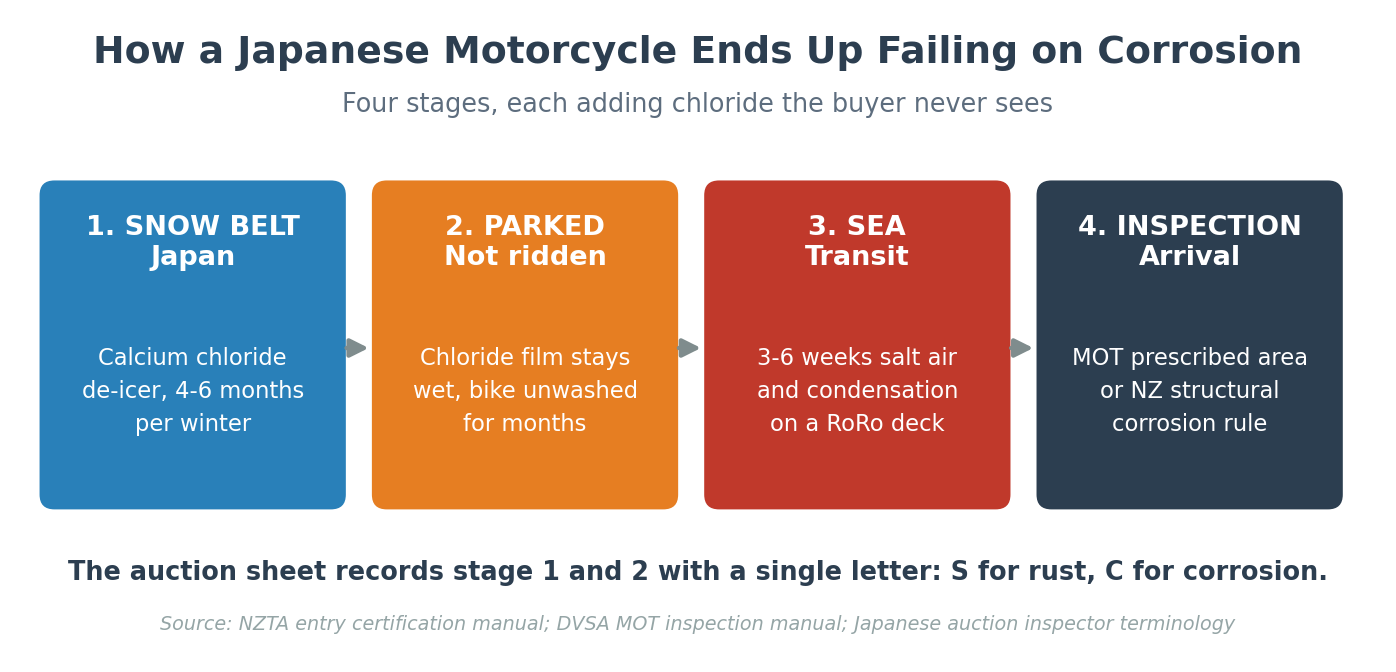
Japanese motorcycle rust is the one thing every import guide waves at and nobody explains properly. You get told "Japanese bikes don't rust because Japan doesn't salt its roads," and then your bike lands, you put it on a lift, and the swingarm pivot area looks like it spent a decade in a fishing port.
Here's the thing nobody mentions: the Japanese auction inspector already told you. He wrote it on the sheet. He used a single letter and a single digit, and because that letter is S and the digit is 2, and because the rest of the line was in Japanese, you scrolled past it.
This guide is about that letter. What S and C actually mean to a Japanese inspector, why two respected Japanese exporters publish flatly contradictory claims about road salt, which components on a JDM motorcycle rot first and in what order, and — the part that costs real money — exactly what the UK MOT and New Zealand entry certification reject when the bike arrives.
One warning up front, because it reverses the advice you will get almost everywhere else: having your import undersealed or rust-proofed before it goes through New Zealand entry certification can fail it. Not "may raise questions." The NZTA inspection manual lists visible rust prevention on the vehicle structure as a trigger for mandatory specialist repair certification, in the same sentence as evidence of collision repair. We will get to that.
Japanese Motorcycle Rust Starts With Three Words, Not One
English-speaking buyers use "rust" for everything from a tea-coloured stain on a bracket to a swingarm you can put a screwdriver through. Japanese auction inspectors do not. They use three distinct terms, and the gap between the first and the third is the difference between a wire brush and a scrapped frame.
Sabi (錆) — rust
The mildest grade. An inspector writing sabi means one thing and one thing only: surface orange discolouration. The metal is still the thickness it left the factory at. Nothing is flaking. On a sheet this is coded S, taken from the first letter of sabi.
Fushoku (腐食) — corrosion
A step up, and the step that matters. Fushoku means orange discolouration of metal that is flaking away. The operative phrase is "flaking away." You are no longer looking at a colour change on the surface; you are looking at metal leaving the component. On a sheet this is coded C, taken from the English word corrosion.
Fushoku-ana (腐食穴) — corrosion hole
The end state. The metal has flaked away until it is gone and there is a hole. Inspectors usually write this in full Japanese, or as C followed by the kanji for hole (穴). On four-wheeled lots this alone is normally enough to drop a vehicle to Grade 2, regardless of how tidy the paint is.
Both S and C are usually followed by a severity digit. S1 is mild, S2 medium, S3 severe. C1, C2 and C3 run the same scale, one tier worse at every step. So C1 is not "a bit of rust" — it is early metal loss, and it outranks S3 in every way that matters to an inspector in Auckland or a tester in Coventry.
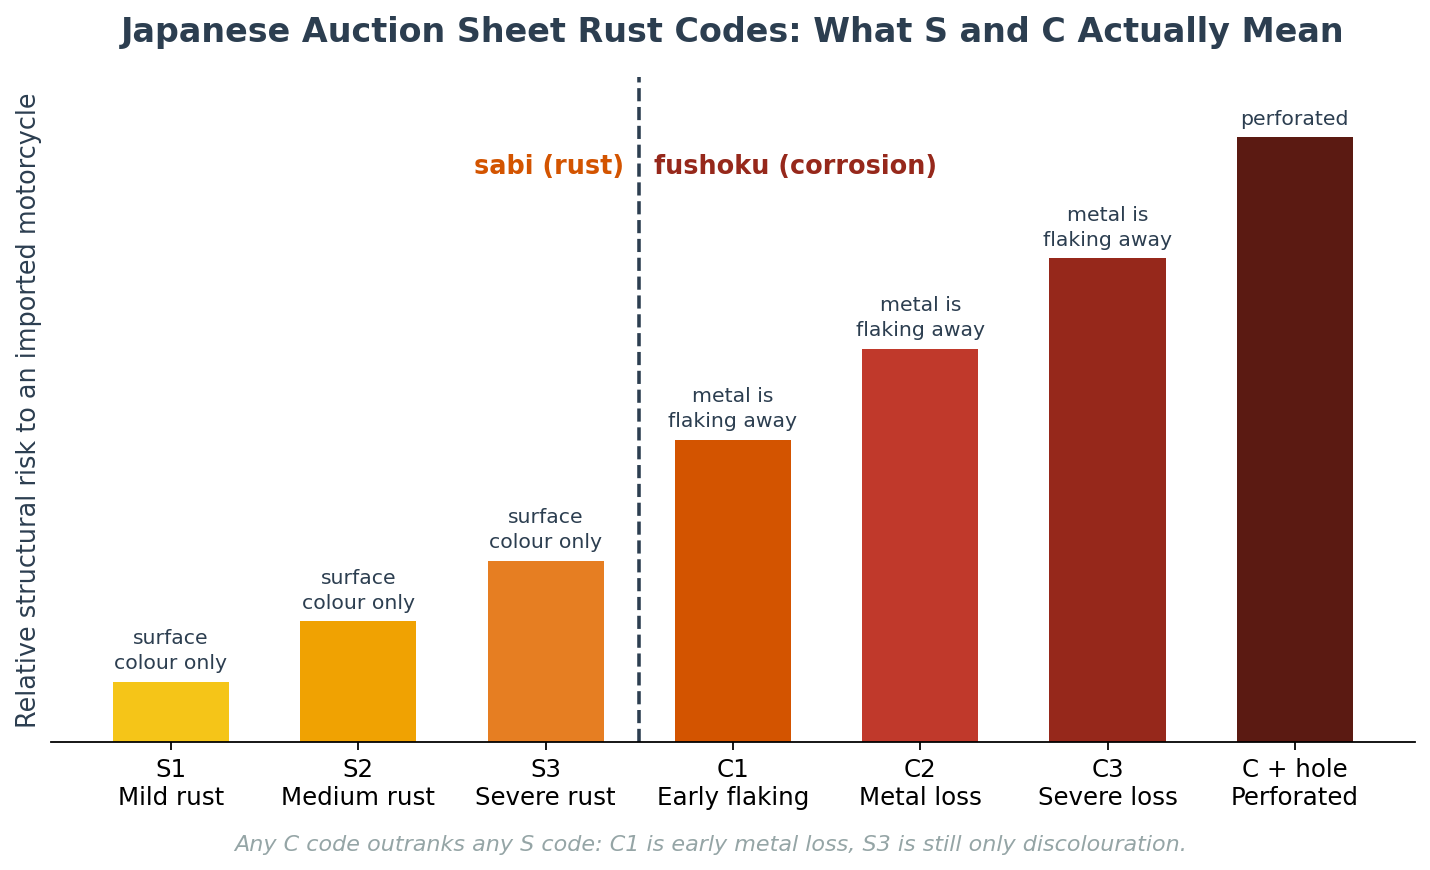
Learn those six codes and you have already filtered out most of the bikes that will cost you money. Our full walkthrough of the document lives in the auction sheet guide, and the numeric overall grades are broken down in Japanese auction grades explained.
Two Japanese Exporters, Two Opposite Answers on Road Salt
This is where the industry contradicts itself in public and nobody calls it.
Integrity Exports, a JUMVEA-member exporter based in Osaka, states in its auction academy that "grit is only rarely used and salt never used on roads even in the snowiest parts of Japan."
Nikkyo, another Japanese exporter, publishes the opposite: rust in snowy regions "is accelerated by a substance called sodium chloride, commonly used in road-salt or cryoprotectant. During the winter seasons, the roads are often covered with anti-freezing agents."
Two Japanese companies, both selling Japanese vehicles to foreigners, both writing in English, giving buyers directly opposed advice about the single biggest corrosion variable in the country. If you have been confused about this, that is why.
Both are describing something real. The resolution is chemical, and it is worse news than either version.
Japan's preferred de-icer is not rock salt — and that is not good news
Japan's winter road authorities lean heavily on calcium chloride and magnesium chloride rather than the sodium chloride rock salt spread across northern Europe and the American Midwest. So the claim "salt is never used" is defensible on the narrowest possible reading: rock salt, specifically, is not the standard Japanese treatment.
Functionally it is wrong, because calcium chloride is still a chloride, and it attacks steel through exactly the same mechanism. Chloride ions plus moisture plus oxygen equals electrochemical corrosion. The cation on the front of the molecule does not change that.
What it does change is how long the attack lasts, and this is the part that makes calcium chloride harsher on a motorcycle than rock salt.
Sodium chloride has a deliquescence point around 75% relative humidity. Below that, NaCl residue on a frame sits there as a dry crystal, doing very little. Calcium chloride hexahydrate deliquesces at roughly 29% relative humidity at room temperature. It is aggressively hygroscopic — it pulls water out of the air and holds it. Laboratory work on calcium chloride deposits found that once deliquescence occurs, the salt forms a corrosive electrolyte and the corrosion rate rises sharply, scaling with the ion concentration of the solution that forms.
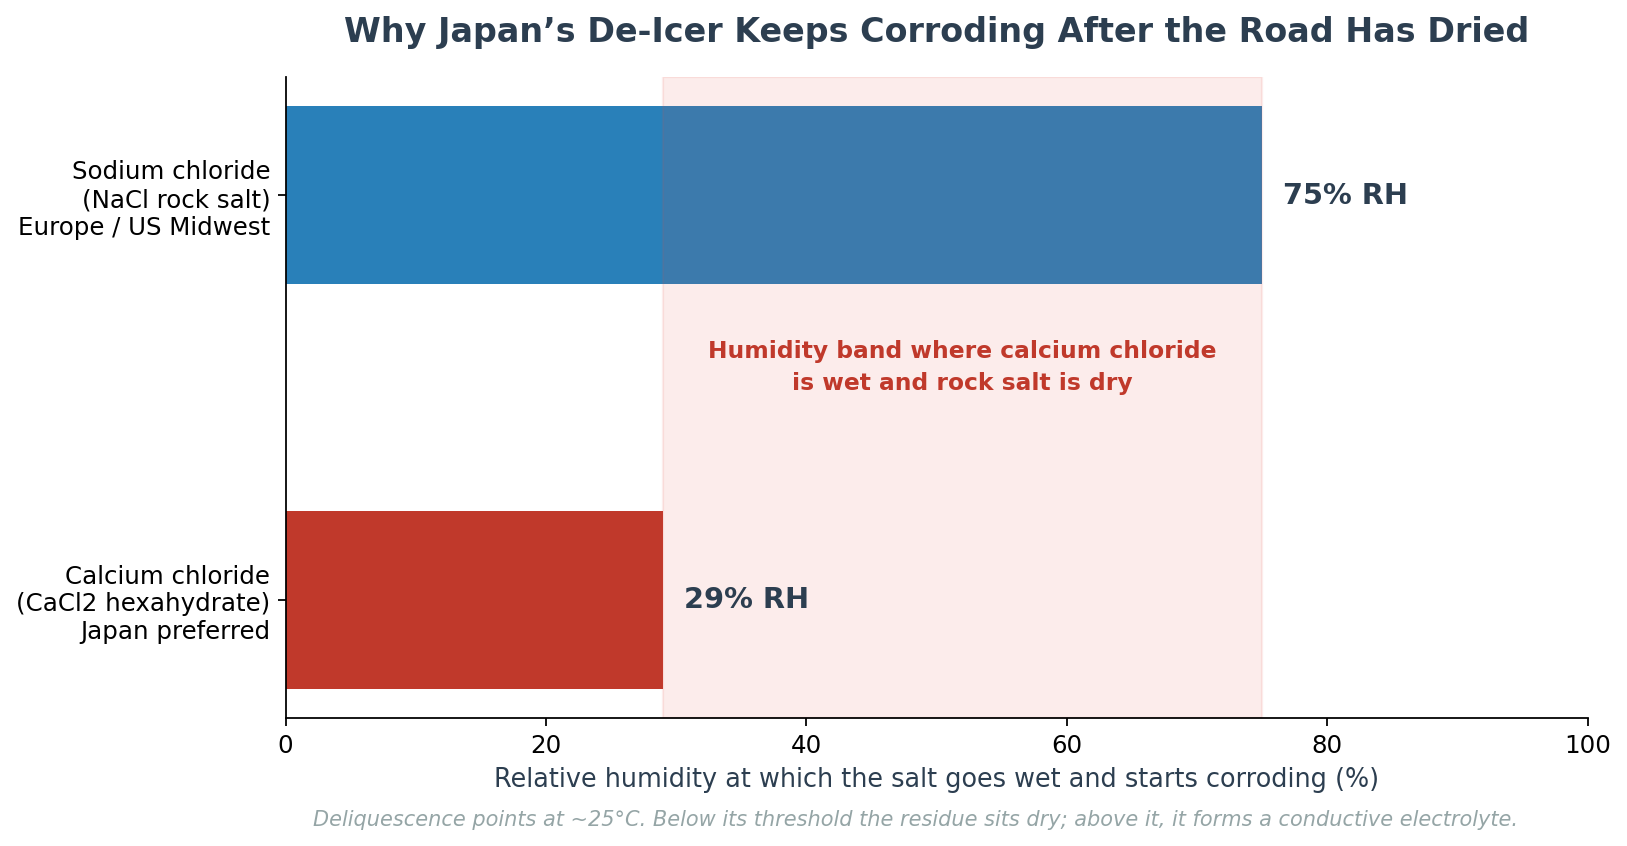
Translate that to a bike parked in a Niigata car port in February. Rock salt residue would spend most of the winter dry. Calcium chloride residue is a wet, conductive film on your frame welds at practically any humidity a Japanese winter produces — and it stays wet after the road has dried, after the bike is parked, and through the spring.
So: Japan mostly does not use rock salt. Japan absolutely uses chloride de-icers. And the ones it prefers keep working on your motorcycle long after the ones it avoids would have stopped.
Where the Bike Lived: Japan's Snow Belt and What It Does to a Frame
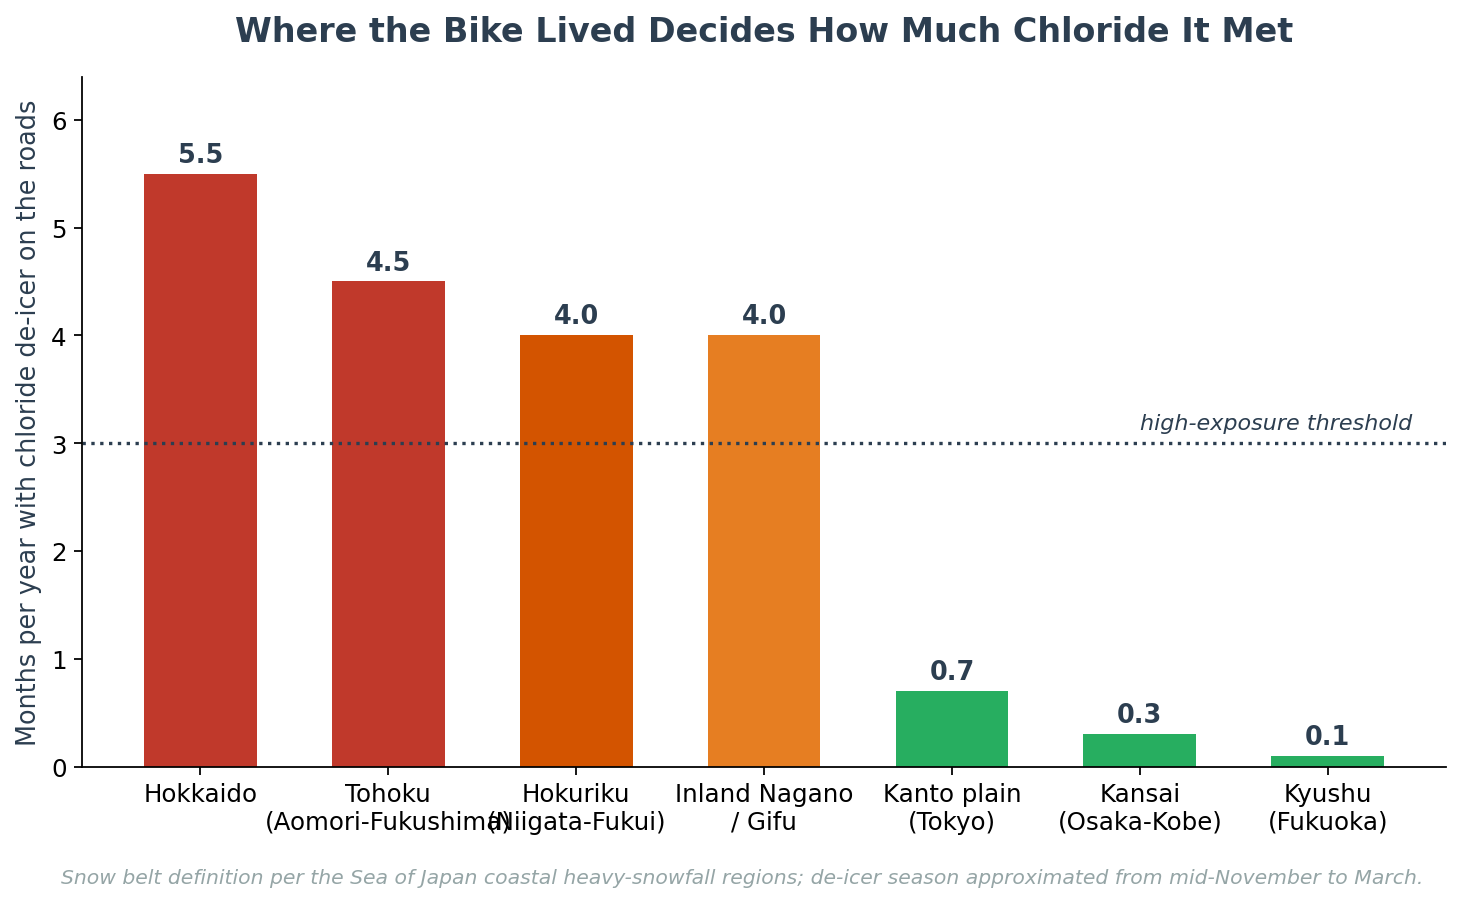
Japan is not one climate. It is a chain of islands with a mountain spine, and the western side of that spine catches one of the heaviest snowfall regimes on earth.
The heavy-snow belt runs along the Sea of Japan coast: all of Hokkaido, the Tohoku region, then Niigata, Toyama, Ishikawa and Fukui, plus the mountainous interiors of Nagano, Gifu, Yamanashi, Shiga, northern Kyoto, northern Hyogo and Nara. Snow sits on those roads from mid-November into March, and in the worst years into May.
Three separate things stack up in that belt:
- Chloride de-icer, applied for four to six months a year. Not one storm's worth. A season's worth, reapplied every freezing night.
- Vehicles that do not get washed. Exporters in the region are blunt about this: people stop washing because the vehicle is filthy again within minutes. The chloride film never gets rinsed off.
- Sea air. The same coastline that generates the snow is a marine-aerosol coastline. Chloride arrives from the sky as well as the road.
Contrast that with a bike that spent its life in Fukuoka, Shizuoka or the Kanto plain. Same model, same year, same mileage, radically different metal.
Here is what most buyers miss: Japanese motorcycles are overwhelmingly a fair-weather vehicle in snow country. A bike registered in Toyama was not ridden through February at all. It has been parked through February — often outdoors under a cover, or in a carport open on three sides, sitting in the salt-laden damp air the whole time without moving. Storage corrosion, not riding corrosion, is what you are usually buying.
That matters because parked corrosion has a signature. It concentrates at the lowest points and the water traps: the underside of the swingarm, the bottom of the exhaust, the caliper carriers, the sidestand bracket, the base of the fork lowers. A bike ridden in salt gets even, dispersed attack across the whole underside. A bike parked in salt-damp air gets deep, localised pitting exactly where water pooled.
The Nine Places Rust Hides on a JDM Motorcycle
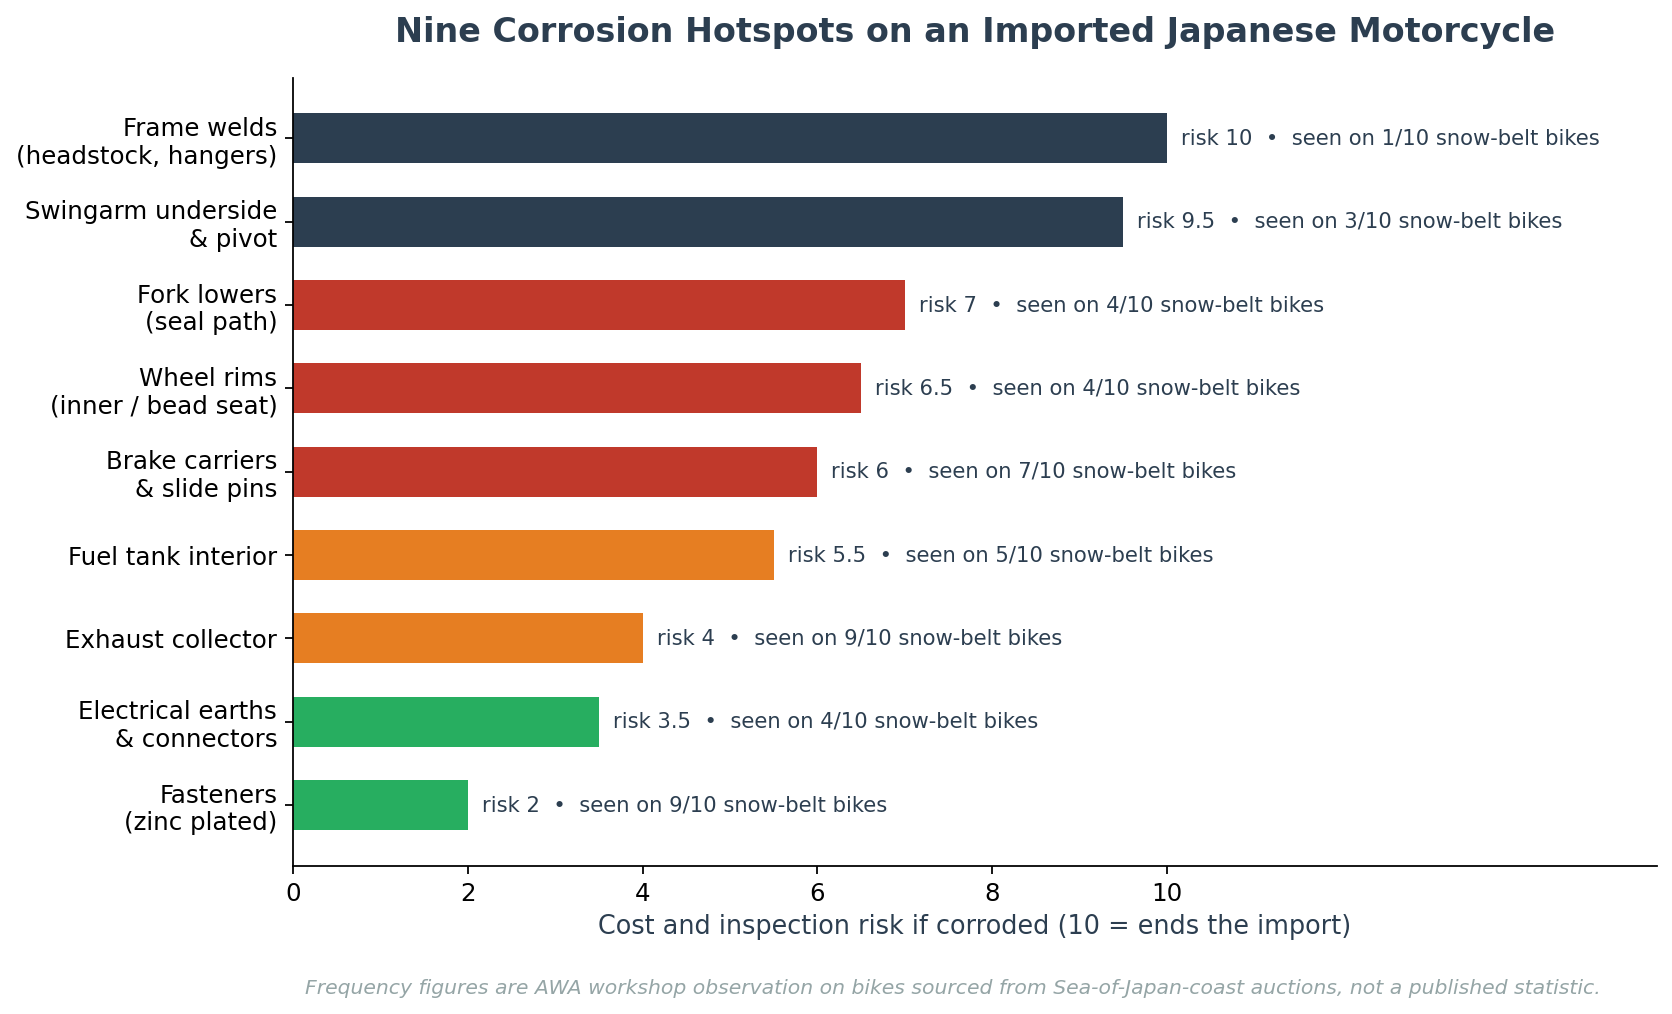
Auction photographs are shot from six standard angles and they will not show you a single one of these. Work down the list in order — it is roughly the order in which a Japanese bike actually rots.
1. Exhaust header collector and the joint under the engine
Almost always first. The collector sits at the lowest point of the bike, catches everything thrown off the front wheel, and heat-cycles the moisture straight into the seam welds. Surface bloom here is normal on any bike over eight years old. Flaking is not.
2. Swingarm underside and the pivot area
The one that ends imports. On a box-section steel swingarm, water enters through the pivot area and the internal drain holes and corrodes from the inside out — meaning the outside can look presentable while the wall thickness is gone. Tap it. A healthy swingarm rings. A rotten one thuds.
3. Fork lowers and the axle pinch bolts
Aluminium fork lowers do not rust, they corrode — white oxide bloom and pitting, particularly around the axle clamps and the fender mounts where the anodising has been chipped. Pitting under the fork seal running surface is a leak waiting to happen.
4. Wheel rims, especially the inner lip
Cast alloy wheels corrode at the bead seat and the inner rim where salt collects and never dries. This is invisible with a tyre fitted. Ask specifically whether the wheels have been off.
5. Brake disc carriers and caliper hardware
Not the disc face — that gets polished by the pads. The carrier, the bobbins on a floating disc, the caliper slide pins and the bracket bolts. Seized slide pins are the single most common post-import brake fault on a snow-belt bike.
6. Fasteners: the honest indicator
Look at the bolt heads on the engine cases, the sprocket cover, the brake caliper mounts. Japanese fasteners are usually zinc-plated. Once the plating goes, the fastener browns quickly. Uniformly rusty fasteners across the whole bike are a better exposure test than any single component, because nobody bothers replacing them cosmetically.
7. Fuel tank interior
Chloride is not the cause here — condensation in a part-full tank is — but snow-belt bikes get laid up over winter and laid-up bikes get tank rust. Ask for a photo down the filler with a torch. Scale in the tank means the fuel pump, the filter and the injectors are already contaminated.
8. Electrical connectors and the earth points
Green crust on the earth strap where it bolts to the frame, corrosion inside the regulator/rectifier connector, chalky terminals at the starter relay. These cause intermittent faults that take longer to diagnose than they do to fix, and they never show on a sheet.
9. Frame welds at the headstock and footpeg hangers
Last on the list because it is rarest, and first in importance because it is the one that fails an inspection outright. Weld beads hold moisture in the ripple. Rust bleeding out of a weld line at the headstock is the finding that turns a cheap import into a scrapped frame.
Salt Air, Not Road Salt: What the Ocean Voyage Adds
Your bike does not stop corroding when it leaves the auction yard. Between the Japanese port and your driveway there are three to six weeks in one of the most corrosive environments on the planet, and the shipping method you pick decides how much of it touches the metal.
Roll-on/roll-off decks are covered but not sealed and not climate-controlled. The vehicle sits in circulating sea air for the whole voyage, through repeated condensation cycles as the ship crosses temperature bands. Salt spray reaches the lower decks. RoRo is cheaper, and for a bike that is already tidy it is an acceptable trade — but it is genuinely additive corrosion, not a myth.
Container shipping seals the bike inside a steel box with no exposure to outside air, salt spray, or contact with other vehicles. The standard recommendation across the freight industry is container for anything with fresh paintwork, aftermarket exterior finishes, or bare metal. For a restored or freshly-detailed JDM bike, that is exactly your situation.
Three practical points that matter more than the method:
- Condensation inside a sealed container is real. A bike loaded warm and humid in a Japanese August, then shipped through cold water, will sweat inside the box. Desiccant bags in the container are cheap and almost nobody asks for them.
- Wash the bike before it loads, not after it lands. Six weeks of transit with a winter's chloride film still on the frame is six weeks of accelerated attack you paid for.
- Photograph the underside at the yard. If corrosion is disputed on arrival, dated pre-shipment photographs are the only thing that separates transit damage from pre-existing damage.
We cover the cost and handling trade-offs in full in container vs RoRo motorcycle shipping and the wider process in shipping a motorcycle from Japan.
What the UK MOT Actually Fails: The 30cm Prescribed Area
UK buyers hear "it'll fail the MOT on rust" and imagine a tester with an opinion. There is no opinion involved. The DVSA inspection manual defines the geometry precisely, and once you know it you can assess a bike from auction photographs better than most people can standing next to it.
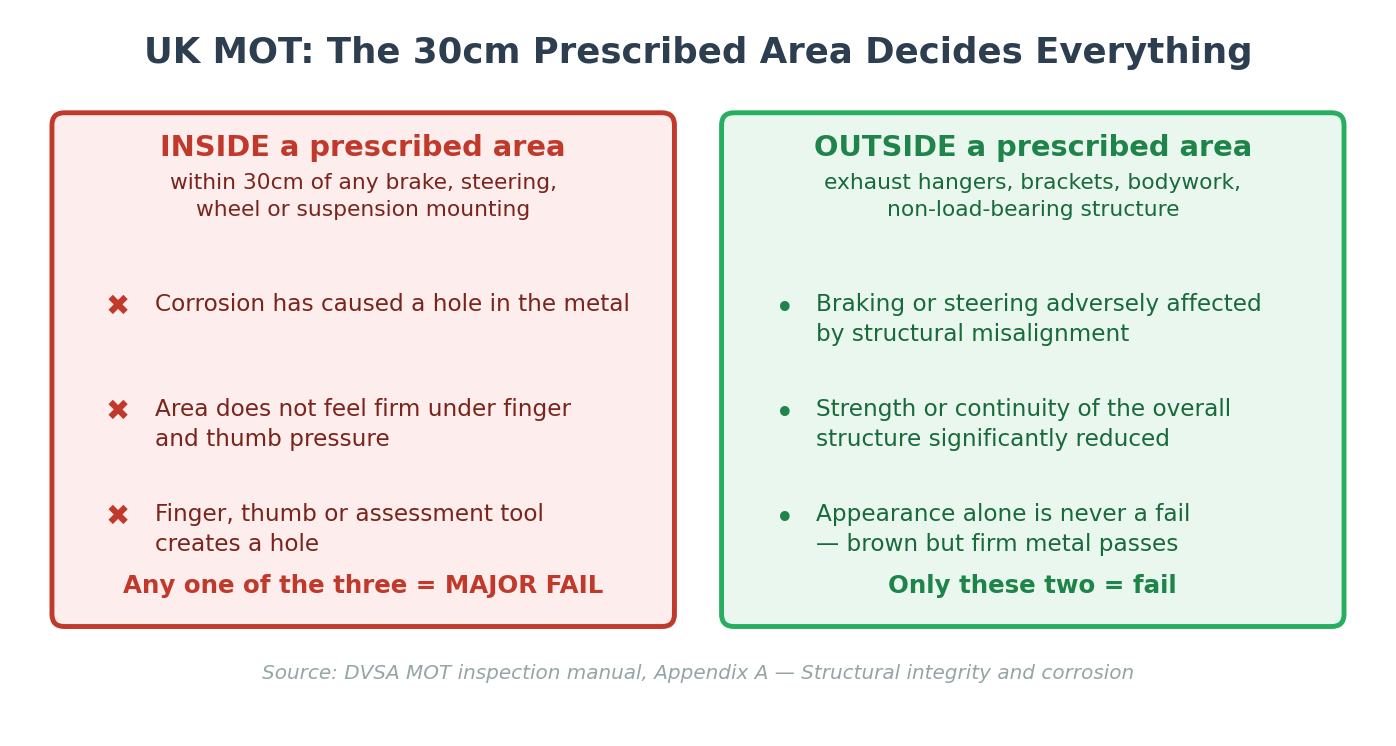
The manual defines a prescribed area as two things: load-bearing parts of the vehicle to which testable items are mounted, and any load-bearing or supporting structure within 30cm of that mounting location. Testable items means brakes, steering, axles, wheels, tyres and suspension.
Draw a 30cm sphere around every one of those mounting points on a motorcycle and you get the map that actually matters:
- Headstock and the frame tubes running back from it — steering mounting
- Swingarm pivot and the frame around it — suspension mounting
- Shock top mount and the subframe or cross-tube it lands on — suspension mounting
- Caliper mounting lugs on the fork lower and the swingarm — brake mounting
- Engine mounting lugs on a stressed-member frame — load-bearing structure
Inside those zones, the DVSA inspection manual gives the tester three failure criteria, and any one of them is enough:
- The corrosion has caused a hole in the metal
- The area does not feel firm under finger-and-thumb pressure
- Finger, thumb, or the corrosion assessment tool creates a hole
Notice what is not on that list: appearance. Brown metal that is still firm passes. The manual is explicit that the tool "must be restricted to ascertaining that the failure criteria are met and not used for heavy scraping or poking."
Outside the prescribed areas the bar drops sharply. Structural corrosion elsewhere is only a rejection if braking or steering is adversely affected by structural misalignment, or the strength or continuity of the overall structure is significantly reduced. A rusty exhaust hanger 40cm from anything is an advisory, not a fail.
The highly-stressed component rule catches people out
Separately from the prescribed-area geometry, the manual treats highly stressed components — steering and suspension arms, rods and levers — under their own standard. They fail if corrosion has caused a serious reduction in overall material thickness, or a hole or split, anywhere on the component. On a motorcycle that captures the swingarm, the linkage arms, brake torque arms and gear linkage rods regardless of how far they sit from a mounting point.
And the repair rule is tighter still: welded repairs to highly stressed components are not normally acceptable. If your swingarm is holed, a plate welded over it is not a fix that passes. It is a swingarm you replace.
The manual also lists methods you cannot use anywhere load-bearing: gas brazing, soldering, adhesive bonding, fibre reinforcement, and body filler. Filler over a corroded frame tube is a fail, and it is a fail that also tells the tester something about everything else on the bike.
If your import is going through the UK system, this interacts with the single-vehicle approval process — see the MSVA test guide and the NOVA registration guide for how the sequence fits together.
What New Zealand Actually Fails — And the Repair-Certifier Trap
New Zealand runs the strictest corrosion regime in the English-speaking import world, and it applies to motorcycles and mopeds explicitly. The NZTA entry certification manual states its scope as light vehicles "including motorcycles and mopeds where applicable."
The headline rule is short: a vehicle must be specialist repair certified if there is corrosion damage in any structural area. Not repaired. Not advised. Referred to a specialist repair certifier, which is a separate paid process with its own timeline.
NZTA defines the damage in physical terms. Corrosion damage is where a metal structure "has been eaten away and could be seen as bubbling or pitting of the steel elements," with outward signs of "lifting, bubbling or discolouring of painted surfaces." Perforated corrosion is holes, or holes exposed when rust scale is removed — and critically, "if metal is badly pitted causing a loss of metal thickness it must also be treated as perforated corrosion." Pitting alone, with no hole yet, counts as perforation.
Rust bleed: a stain is enough to flag the bike at the border
This is the finding almost nobody imports prepared for. NZTA's note on the corrosion criteria states that corrosion damage includes any signs of "rust bleed" — defined as "a rust coloured stain or mark that appears around an area of corrosion that may not be visible," most commonly where panels join or overlap and moisture has carried a stain onto the external surface.
So the trigger is not a hole. It is not even visible corrosion. It is a stain that implies corrosion somewhere you cannot see. A border inspection organisation that spots rust bleed flags the vehicle as damaged on LANDATA, and clearing that flag is its own paperwork exercise: the vehicle inspector has to complete a "Request to remove border damage flag" form and hand it to an authorised supervisor.
On a motorcycle, rust bleed shows up at exactly the places you would expect and nowhere you would look — the seam where the subframe bolts to the main frame, under the swingarm pivot caps, around the sidestand bracket weld.
Bolt-on parts are a rejection, but not a certification
There is a useful asymmetry here. NZTA states that structural components which can be unbolted, when damaged or corroded, "are a reason for rejection. However, these parts can be replaced by the owner and re-inspected without the need for repair certification."
Read that as your escape route. A corroded bolt-on subframe, a corroded shock, corroded brake caliper carriers — you buy the part, fit it, get re-inspected, and you never enter the specialist repair certification process. A corroded main frame or a corroded swingarm on a bike where the swingarm carries the certification-relevant structure does not have that exit.
Full country process is in our New Zealand import guide.
The Underseal Trap: Why Protecting Your Import Can Fail It
Now the reversal, and it is worth reading twice because it contradicts the advice on every forum thread about importing to New Zealand.
NZTA's list of damage that must be referred to a specialist repair certifier includes this line: a vehicle must be referred "if signs of repair, rust prevention, acid wash or under-sealing to any part of the vehicle structure are evident."
Rust prevention sits in that sentence next to evidence of collision repair. The logic is not that NZTA thinks rust-proofing is bad. The logic is that a coating is opaque, and an inspector who cannot see the metal cannot certify the metal. A freshly undersealed structure is, from a certifier's point of view, a structure someone has deliberately made unassessable — and they treat it accordingly.
The consequence for importers is direct and expensive. If you buy a snow-belt bike, get it professionally rust-proofed in Japan because that is the responsible-sounding thing to do, and ship it to New Zealand, you have converted a straightforward entry certification into a mandatory specialist repair certification. You paid twice: once for the coating, once for the process the coating triggered.
There is a narrow carve-out — NZTA runs a separate technical bulletin covering rust prevention and under-sealing on late-model cars from the UK — but it is scoped to that specific case, not to a Japanese motorcycle.
The correct sequence is: import bare, certify, then protect. Get the bike through entry certification with the metal visible, then apply cavity wax, ACF-50 or your coating of choice. The order costs you nothing and saves the certification.
Acid wash: NZTA named the trick in a technical bulletin
The same sentence lists acid wash, and the manual cross-references a dedicated technical bulletin on the acid wash process on used imports. That tells you something about how common the practice is.
Acid washing strips surface rust chemically and leaves a clean, uniform grey underside that photographs beautifully. It also removes the visual evidence a certifier uses to judge how far the corrosion went, and if the acid is not fully neutralised it keeps working. NZTA treats visible evidence of it the same way it treats underseal: as something that must go to a specialist.
If an auction bike's underside looks conspicuously cleaner than the rest of the machine — uniform matte grey, no road film, no original factory markings — that is not a well-kept bike. That is a prepared one.
Reading the Sheet Before You Bid: A Six-Step Screen
You do not need Japanese to filter out most corrosion risk. You need six habits, applied in order, before you put a number on anything.
Step 1 — Scan the inspector's comment block for the bare letters S and C
The comments are written in Japanese, but S and C are Latin characters and they stand out. Any S or C followed by a digit is a corrosion note. You do not need to read the surrounding sentence to know the bike deserves a translation before you bid.
Step 2 — Treat any C as a different category of bike, not a worse one
S3 is severe surface rust and a weekend with a wire wheel. C1 is early metal loss and a question about wall thickness. Do not let the digit fool you into ranking them on one scale. Any C on a frame, swingarm or suspension component is a stop, not a discount.
Step 3 — Check where the bike is being sold from
Auction location is a proxy for where the bike lived. A lot running through a Sea-of-Japan-coast or Hokkaido auction house has a materially different corrosion prior than the same model in Osaka or Fukuoka. It is not a guarantee — bikes get traded across the country — but combined with a bare S note it moves the odds a long way. Our guide to the Japanese motorcycle auction houses covers who sits where.
Step 4 — Cross-check the mileage against the corrosion
Low mileage plus visible corrosion is the classic snow-belt signature: the bike was parked, not ridden, through the salt seasons. High mileage plus clean metal usually means a warm-prefecture commuter. The combination that should worry you is very low mileage with any corrosion note at all, because a bike that only did 8,000km and still corroded was stored badly for years. Mileage reading itself has its own traps, covered in the export certificate guide.
Step 5 — Request the three photographs nobody takes
Standard auction photography will not show you anything on the nine-point list. Ask your agent for exactly three: underside of the swingarm, the exhaust collector from below, and down the fuel filler with a torch. Those three cover the highest-cost failure modes on the list.
Step 6 — Ask one question in writing
"Has the underside been cleaned, painted, undersealed or acid-washed?" Get the answer in writing before you bid, not after. If the answer is yes and you are importing to New Zealand, you now know what that costs you. If the answer is evasive, that is an answer too.
Bidding mechanics and how to brief an agent are in how to bid on a Japanese motorcycle auction.
What Rust Actually Costs to Fix
Numbers, because "budget for some rust" is not a plan. These are typical UK and Australasian workshop figures for a mainstream Japanese middleweight; parts sourced used from Japan where sensible.
- Fasteners, full replacement set (stainless): £90–£180 / NZ$190–NZ$380. Half a day of your own time. The single highest visual return per pound spent on the whole bike.
- Exhaust system, used JDM replacement: £180–£450 / NZ$380–NZ$950 plus freight. A rusted-through collector is not economically weldable on a modern multi-cylinder header.
- Caliper rebuild, pair, including pistons and seals: £160–£320 / NZ$340–NZ$680. Assume you need this on any snow-belt bike; seized pistons are the default, not the exception.
- Wheel refinish, pair, blast and powder coat: £220–£400 / NZ$460–NZ$840, plus tyres, because they come off anyway.
- Fuel tank de-rust and internal seal: £120–£250 / NZ$250–NZ$530. Add a pump and filter if scale has already circulated.
- Swingarm, used replacement including bearings: £200–£500 / NZ$420–NZ$1,050. Cheaper than certification, always.
- NZ specialist repair certification: budget NZ$800–NZ$2,500 depending on what is found and what has to be re-engineered, plus weeks of calendar time and a re-inspection.
- Frame replacement: the point at which the project stops. A replacement frame carries a different number, which means new identity paperwork in most jurisdictions, which means you have bought a parts bike.
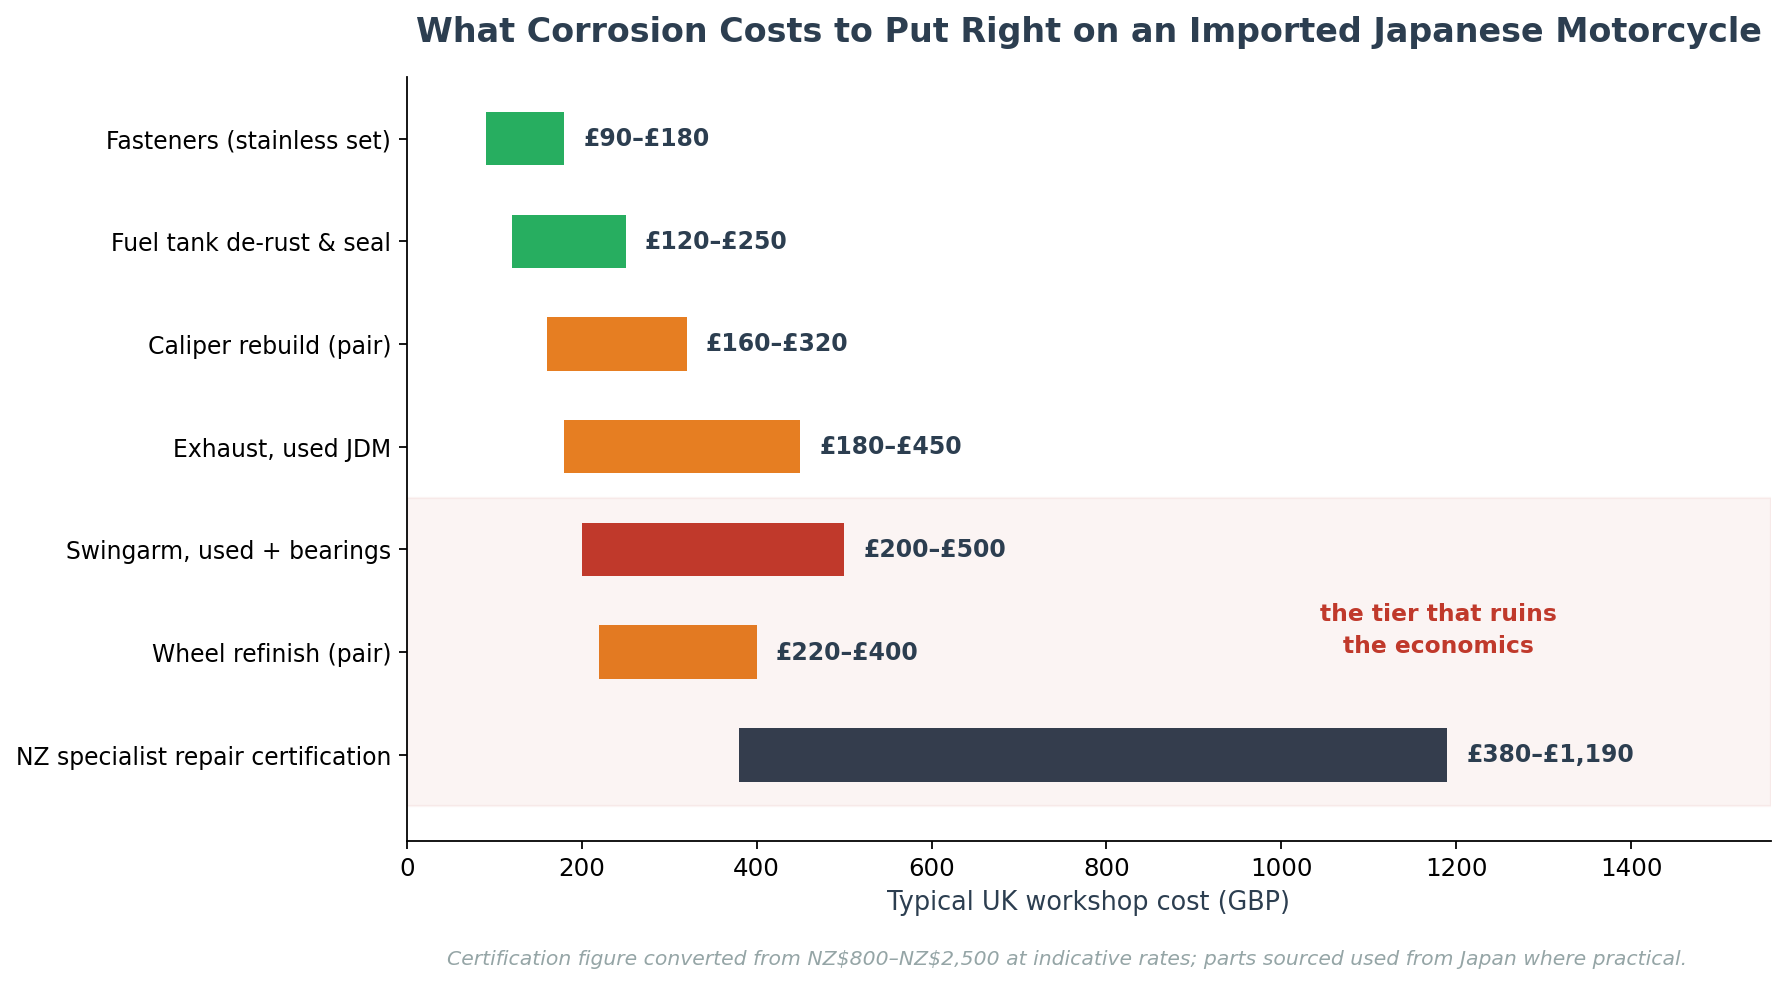
The shape of that list is the argument. Everything above the swingarm line is a normal recommissioning budget on a fifteen-year-old bike from anywhere. Everything from the swingarm down is a category error at purchase. Corrosion does not cost you a little bit more on every bike — it costs you nothing on most and ruins the economics on a few. Your entire job at the bidding stage is telling which is which.
The Rust You Should Ignore
A counterweight, because the opposite mistake is also expensive.
Buyers who learn about corrosion overcorrect and start rejecting every bike with a brown fastener. That is how you end up paying a 30% premium for a bike from Kyushu that has a worse service history than the Niigata one you walked away from.
Ignore these:
- Surface bloom on the exhaust downpipes. Universal on any bike past about six years. It cleans off. It is not structural and it never was.
- Brown discolouration on the disc carriers and disc edges. Cosmetic. The friction surface is fine after two stops.
- Light corrosion on the chain and sprockets. These are consumables. You are replacing them at import anyway on any bike with unknown chain history.
- White oxide bloom on unpainted engine cases. Aluminium doing what aluminium does. A polish job, not a defect.
- Rust on the sidestand and centrestand feet. Contact wear. Ubiquitous. Means nothing about the frame.
- An S1 note on the sheet with no location comment. On a bike over ten years old, S1 is close to the baseline condition of the entire Japanese used market.
The discipline is simple: corrosion matters where it is load-bearing, where it is inside a closed section, or where it is inside a 30cm prescribed area. Everywhere else it is a cleaning job priced into a used bike.
Which is why a snow-belt bike with a documented service history and S-notes on the exhaust and fasteners is often the smartest buy on the board. The market discounts it for the letter on the sheet. You are buying the mechanicals.
Aluminium and Chrome: The Corrosion That Isn't Rust
Half the corrosion on a Japanese motorcycle is not rust, and the fixes are completely different.
Aluminium does not form flaking red oxide. It forms a white, chalky, powdery bloom, and unlike rust that bloom is partly self-protecting — the oxide layer slows further attack. What defeats it is chloride, which pits straight through the oxide layer and keeps going in a narrow channel. That is why salt-exposed aluminium looks fine at a glance and then reveals deep individual pits when you clean it: engine case covers, fork lowers, wheel rims, master cylinder bodies, top yokes.
Pitted aluminium is usually cosmetic. It becomes structural in exactly two places on a motorcycle: fork lower sliding surfaces, where a pit under the seal path guarantees a leak that will not stop until the leg is replaced, and wheel rim bead seats, where deep pitting stops a tubeless tyre sealing. Both are replace-not-repair.
Chrome fails differently again. Chrome plating over steel is a hard, thin, brittle shell, and once chloride finds a chip or a crack it attacks the steel underneath and lifts the chrome off in flakes from below. So chrome pitting is never surface-level — by the time you can see it, the steel behind it has already gone. Exhaust silencers, older-model mudguards and handlebars are where you find it, and the honest answer is that re-chroming costs more than a good used part from Japan.
Zinc plating, which is what most Japanese fasteners and brackets wear, is a sacrificial coating — it corrodes preferentially to protect the steel underneath. When you see a uniformly brown bolt head, the zinc has done its job and is now spent, and the steel is next. That is why fastener condition is such a good exposure indicator: it is a coating designed to record how much chloride the bike has met.
The First 30 Days After It Lands
Sequence matters here, and it is not the sequence most people follow.
Week 1: inspect and photograph, do not clean
Get the bike on a lift and photograph everything on the nine-point list before you touch it. If there is transit corrosion to argue about with a shipper, this is the only window. Do not steam-clean the underside yet — you will drive chloride into seams and you will destroy evidence.
Week 1–2: neutralise, then dry
A thorough fresh-water rinse of the underside, then compressed air through every seam and drain hole, then a warm dry space for 48 hours. The goal is not cosmetic. It is removing the chloride film that has been reactivating with every humid night since Japan. Skipping this and going straight to a coating seals the salt in.
Week 2–4: certify, then protect — in that order
Put the bike through MOT, entry certification or single-vehicle approval with the metal bare and visible. Only once it has passed do you apply cavity wax into the frame tubes and swingarm, a corrosion inhibitor on fasteners and electrical connectors, and whatever underbody product you prefer. Reverse that order in New Zealand and you have bought yourself a specialist repair certification.
The ongoing part
An imported Japanese bike is not more fragile than a domestic one, but it arrives with a chloride history you did not control. Cavity wax the closed sections once, service the fasteners once, and after that it is a normal motorcycle. Country-specific process and timing are covered in our Australia, USA and UK import guides.
How AWA Auction Handles Corrosion
Most of what makes corrosion expensive is information asymmetry. The inspector saw the bike. You saw six photographs and a sheet you could not read. Everything above exists to close that gap before you commit money.
That is the part of the process we run on your behalf. Every lot we quote comes with the full auction sheet, translated — including the inspector's comment block, which is where the S and C notes live and where machine translation reliably falls over. We tell you what the letter and digit mean for your specific market, not in general.
Where the sheet is ambiguous, we ask for the photographs that answer it: swingarm underside, collector from below, inside the tank. Where a bike is coming out of the snow belt, we say so, and we tell you what it does to your entry certification or MOT odds rather than leaving you to find out at the inspection station.
And if a bike is prepared — undersealed, acid-washed, underside painted — we flag it, because in New Zealand that single fact changes the certification path and the cost.
You can see what is currently available on our live listings, or talk to our team about a specific model and market before you bid on anything. If you are new to the whole process, start with how to import a motorcycle from Japan and what JDM actually means.
Japanese motorcycle rust is not a reason to avoid importing. Japan's used bikes are still, on average, the best-kept in the world. It is a reason to read one more line on the sheet than the person bidding against you.
See Also
Share this article: